Wednesday, December 26, 2018

New Mac Tips

For all those new Mac owners out there after Christmas here is a list of some settings I typically toggle when setting up a new Mac.  


  • Spotlight - One of the greatest tools I use everyday on my Macs is Spotlight.  Just hit command+space bar or click the magnifying glass in the top right corner, and you will get a little search box.  You can type in the name of files, preference panels or apps in it to quickly launch them.  It can also be used as a calculator in a pinch.
  • Organize System Preferences Alphabetically
    1. Open System Preferences
    2. Under the view menu select "Organize Alphabetically"
  • Update clock to display day and date
    1. Open System Preferences
    2. Go to "Date & Time" preferences
    3. Go to the Clock tab
    4. Check the "Show day of the week" and "Show date" option
  • Move the Dock to the right (especially for MacBooks because that vertical real estate is limited)
    1. Open System Preferences
    2. Go to the "Dock" preferences
    3. Change the "Position on screen" to the "Right" option
    4. While your at it you may want to change the size so the Dock icons are smaller
    5. You can also drag items right off your dock if you don't think you will use them very often
  • Apple Watch unlock (so you don't have to type your password in every time)
    1. Open System Preferences
    2. Go to the "Security & Privacy" preferences
    3. Check the "Allow your Apple Watch to unlock your Mac"
  • Set up Time Machine for your back up
    1. Get an external hard drive (format it using Disk Utility) if it isn't already
    2. Plug in the external hard drive
    3. Open System Preferences
    4. Go to the "Time Machine" preferences
    5. Click the "Select Disk..." to set your backup disk as your external drive
    6. Check the "Backup Automatically" checkbox
    7. Check the "Show Time Machine in menu bar" so you can easily keep an eye on it
    8. Now your computer will be backed up whenever the drive is attached and you also have the ability to go back in time and restore files you may have accidentally deleted.
  • Enable iCloud Features
    1. If you have an iPhone or iPad you will most certainly want to sign in with your iCloud account
    2. Open System Preferences
    3. Go to the iCloud preferences
    4. Log in to your iCloud account
    5. I usually turn on all the different features like Photos, Mail, Contacts, etc...
    6. iCloud Drive has a feature from a couple years ago is the iCloud Drive syncing of your Desktop and Documents folder.  Once you turn that on any files you add to your Desktop or UserName/Documents folder will automatically be synced to iCloud and available from the Files app on your iPhone or iPad.
    7.  In the Messages app you can go to Preferences and go to the iMessage panel. There is an option to "Enable Messages in iCloud" which will put all your Messages in the cloud so they will be accessible from your Mac as well as your iOS devices.
    8. Set up Photos to so you can get your photo library from your iPhone on your computer (if you pay for iCloud Storage of course)
  • Finder Preferences - Some simple changes that make Finder more useful
    1. Open a new Finder window (click on the little Face icon at the end or the dock).  This is how you navigate the file system on macOS
    2. By default every new Finder window defaults to the "Recents" view which shows all the recently used files.  I find this to be less than useful.  If you open Preferences in the Finder menu you can change the "New Finder windows show:" option to either be Documents or your home folder (the one with your name) 


Saturday, December 15, 2018

An iOS macOS Analogy

On ATP episode 304: Island of Shortcuts, Siracusa mentioned the current Apple community discussion about iOS as it compares to macOS and what lies ahead. He said he has been unable to nail down an analogy that perfectly summarizes the differences between two operating systems and their fundamental behaviors like, windows vs. split view, command line vs. shortcuts, Finder vs. Files, and various other areas.

Long after the episode ended I kept thinking about this analogy and lucky for me I had a three hour car ride in my future. I initially focused on Shortcuts and how it was the perfect example of taking a process like writing a little program, but making it work within a rigid framework with a simple user interface. From the beginning iOS has followed this concept for application launching, multi-tasking, files access and application launching. The next requirement for the analogy was finding a situation where the original thing and the new simplified thing continue to live alongside each other. Finally, the hardest part was finding something where the most skilled people at using this thing tended to use the original version rather than the new up and coming process.

I thought about this for a while and then posed these questions to my wife. After a little thought and then some discussion we cracked it, ovens vs. microwave ovens. The oven in this case is macOS and the microwave oven is iOS.
- Both of these can be used to cook food, but in general ovens use a temperature setting while microwaves use the concept of power percentage. I bet there are microwave haters complaining about all the hoops they have to jump through to figure out the different power setting and time combinations just to warm something up properly, when they are used to a single temperature setting for accomplishing the same task.
- Most people when given the choice of having just one of these would go with the oven, even though they would probably be able to cook most of what they wanted to in a microwave oven.
- Extremely skilled chefs can probably cook dishes in the microwave that rival those cooked in a regular oven. The Viticci of microwaves can probably cook a good lasagna.
- The first ovens may have been very simple with a single dial and a limited ability, but some of the microwave ovens todays have a rich set of feature allowing for more complicated cooking options than ever before.
- The microwave oven has a popcorn button for cooking, it doesn’t get much easier.

Do you see it?? Both types of ovens do the same basic things, but they do them in very different ways. Heating up a cup of water is much better suited for the microwave oven, but baking a cake on the other hand is best suited for the big oven. However, in the end it comes down to your preference and what task you are trying to accomplish. I think this is very similar to the areas of iOS and macOS that currently crossover.

I did leave the best until the end though, because you may have noticed I didn’t mention the stove top, well that is the thing that brings this all together. The stove top is the piece of this that really matters, it is the thing that the professional chef needs in order to do his job. It is where the really tricky part of the cooking is done, the most finely honed part of their craft involves frying pans, sauteeing and whateveer other fancy things chefs do with a gas burner. It is the hardest part of the cooking toolset to replicate, because it is so basic in its makeup, but its use cannot be rigidly constrained. The controls are simple, you just turn on a burner, but how do you simplify the next steps of cooking on a stove top for the masses, you can’t just add an omelet button. The tricky part of getting iOS ready for developers is figuring out how to add a stove top so they can cook up some amazing new professional apps.

Shortcut Bubble Trouble

Shortcut Bubble Trouble

On ATP episode 304: Island of Shortcuts, there was a discussion comparing and contrasting Shortcuts and the command line. Marco and Casey made some great points about how the command line, more or less, is something that is common across all major operating systems today. While Shortucts is great it is something new you have to learn, whereas the command line is something lots of people already know and lives just below the surface out of reach of iOS users.

Siracusa said he has played around with Shortcuts and thinks that people have been able to do some impressive and useful things with them. However, he continues that “if you are a programmer then it is far less appealing to use because you have to write a program with little GUI bubbles in a big long linear list”. I definitely related to that, because I have created a few different Shortcuts, from a medical log to one that generates dismissal letters for my kids. Since I am a programmer it would have been a lot quicker for me to just type 4 or 5 commands into a text file rather than going through the tedious process of searching through the blocks, dragging them into position and typing in the various parameters. For example, my medical log shortcut includes 10 blocks, but I bet it could probably be simplified to 3–4 lines of code.

Given the recent discussion around iOS vs macOS it definitely got the gears going in my brain. Do I want a command line app in iOS because I am comfortable in my macOS habits or is it more because it is a more efficient tool? It goes back to a previous blog post I wrote about putting a real keyboard on an iPad, An iOS laptop. Do I want a laptop form factor for iOS because I am more comfortable with it or because that form factor is more efficent for typing and using? Even if I don’t get those things I hope that the Shortcuts team removes a layer of abstraction for the app and lets you write Shortcuts in some sort of an AppleScript or JavaScript format in the future.

Friday, August 17, 2018

macOS Screenshots and the Touchbar

tl;dr  If you change the screenshot destination setting to anything besides Desktop on the Touch Bar it will override the default behavior of the keyboard shortcut and use your setting from the Touch Bar.

I recently got a 2018 13" MacBook Pro with the Touch Bar and it has been an amazing machine.  At first I didn't really love the Touch Bar, but the more I try to use it the better it gets.  The idea of replacing those old function keys with a dynamic display is smart, although I would prefer a physical button for the escape key. 

I was taking a selection screenshot (command-shift-4) today and noticed that the Touch Bar had a couple options on it for the destination of the image (Desktop, Documents, or clipboard) and the thing to capture (selection, window, screen).  I always struggled with the keyboard shortcut for copying to clipboard (ctrl-command-shift-4), so I was delighted to be able to trigger the "file" destination shortcut, but change it to the clipboard using the Touch Bar.

Fast forward to later in the day... I was using an external monitor with the MacBook closed and tried to do a selection screenshot (command-shift-4).  I selected the area to capture, let go and waited for the file to appear on the desktop, but nothing happened.  I tried again, but tried pasting into Messages and to my surprise the image showed up.  Turns out if you change the screenshot destination setting to anything besides Desktop on the Touch Bar it will override the default behavior of the keyboard shortcut and use your setting from the Touch Bar.

In order to change it back you have to get the screenshot controls to appear on the Touch Bar and set the destination to Desktop.

Saturday, June 23, 2018

Iceland in a Couple Days

If you find yourself in Iceland for a couple of days here are my recommendations based on my trip there in 2014.

Blue Lagoon

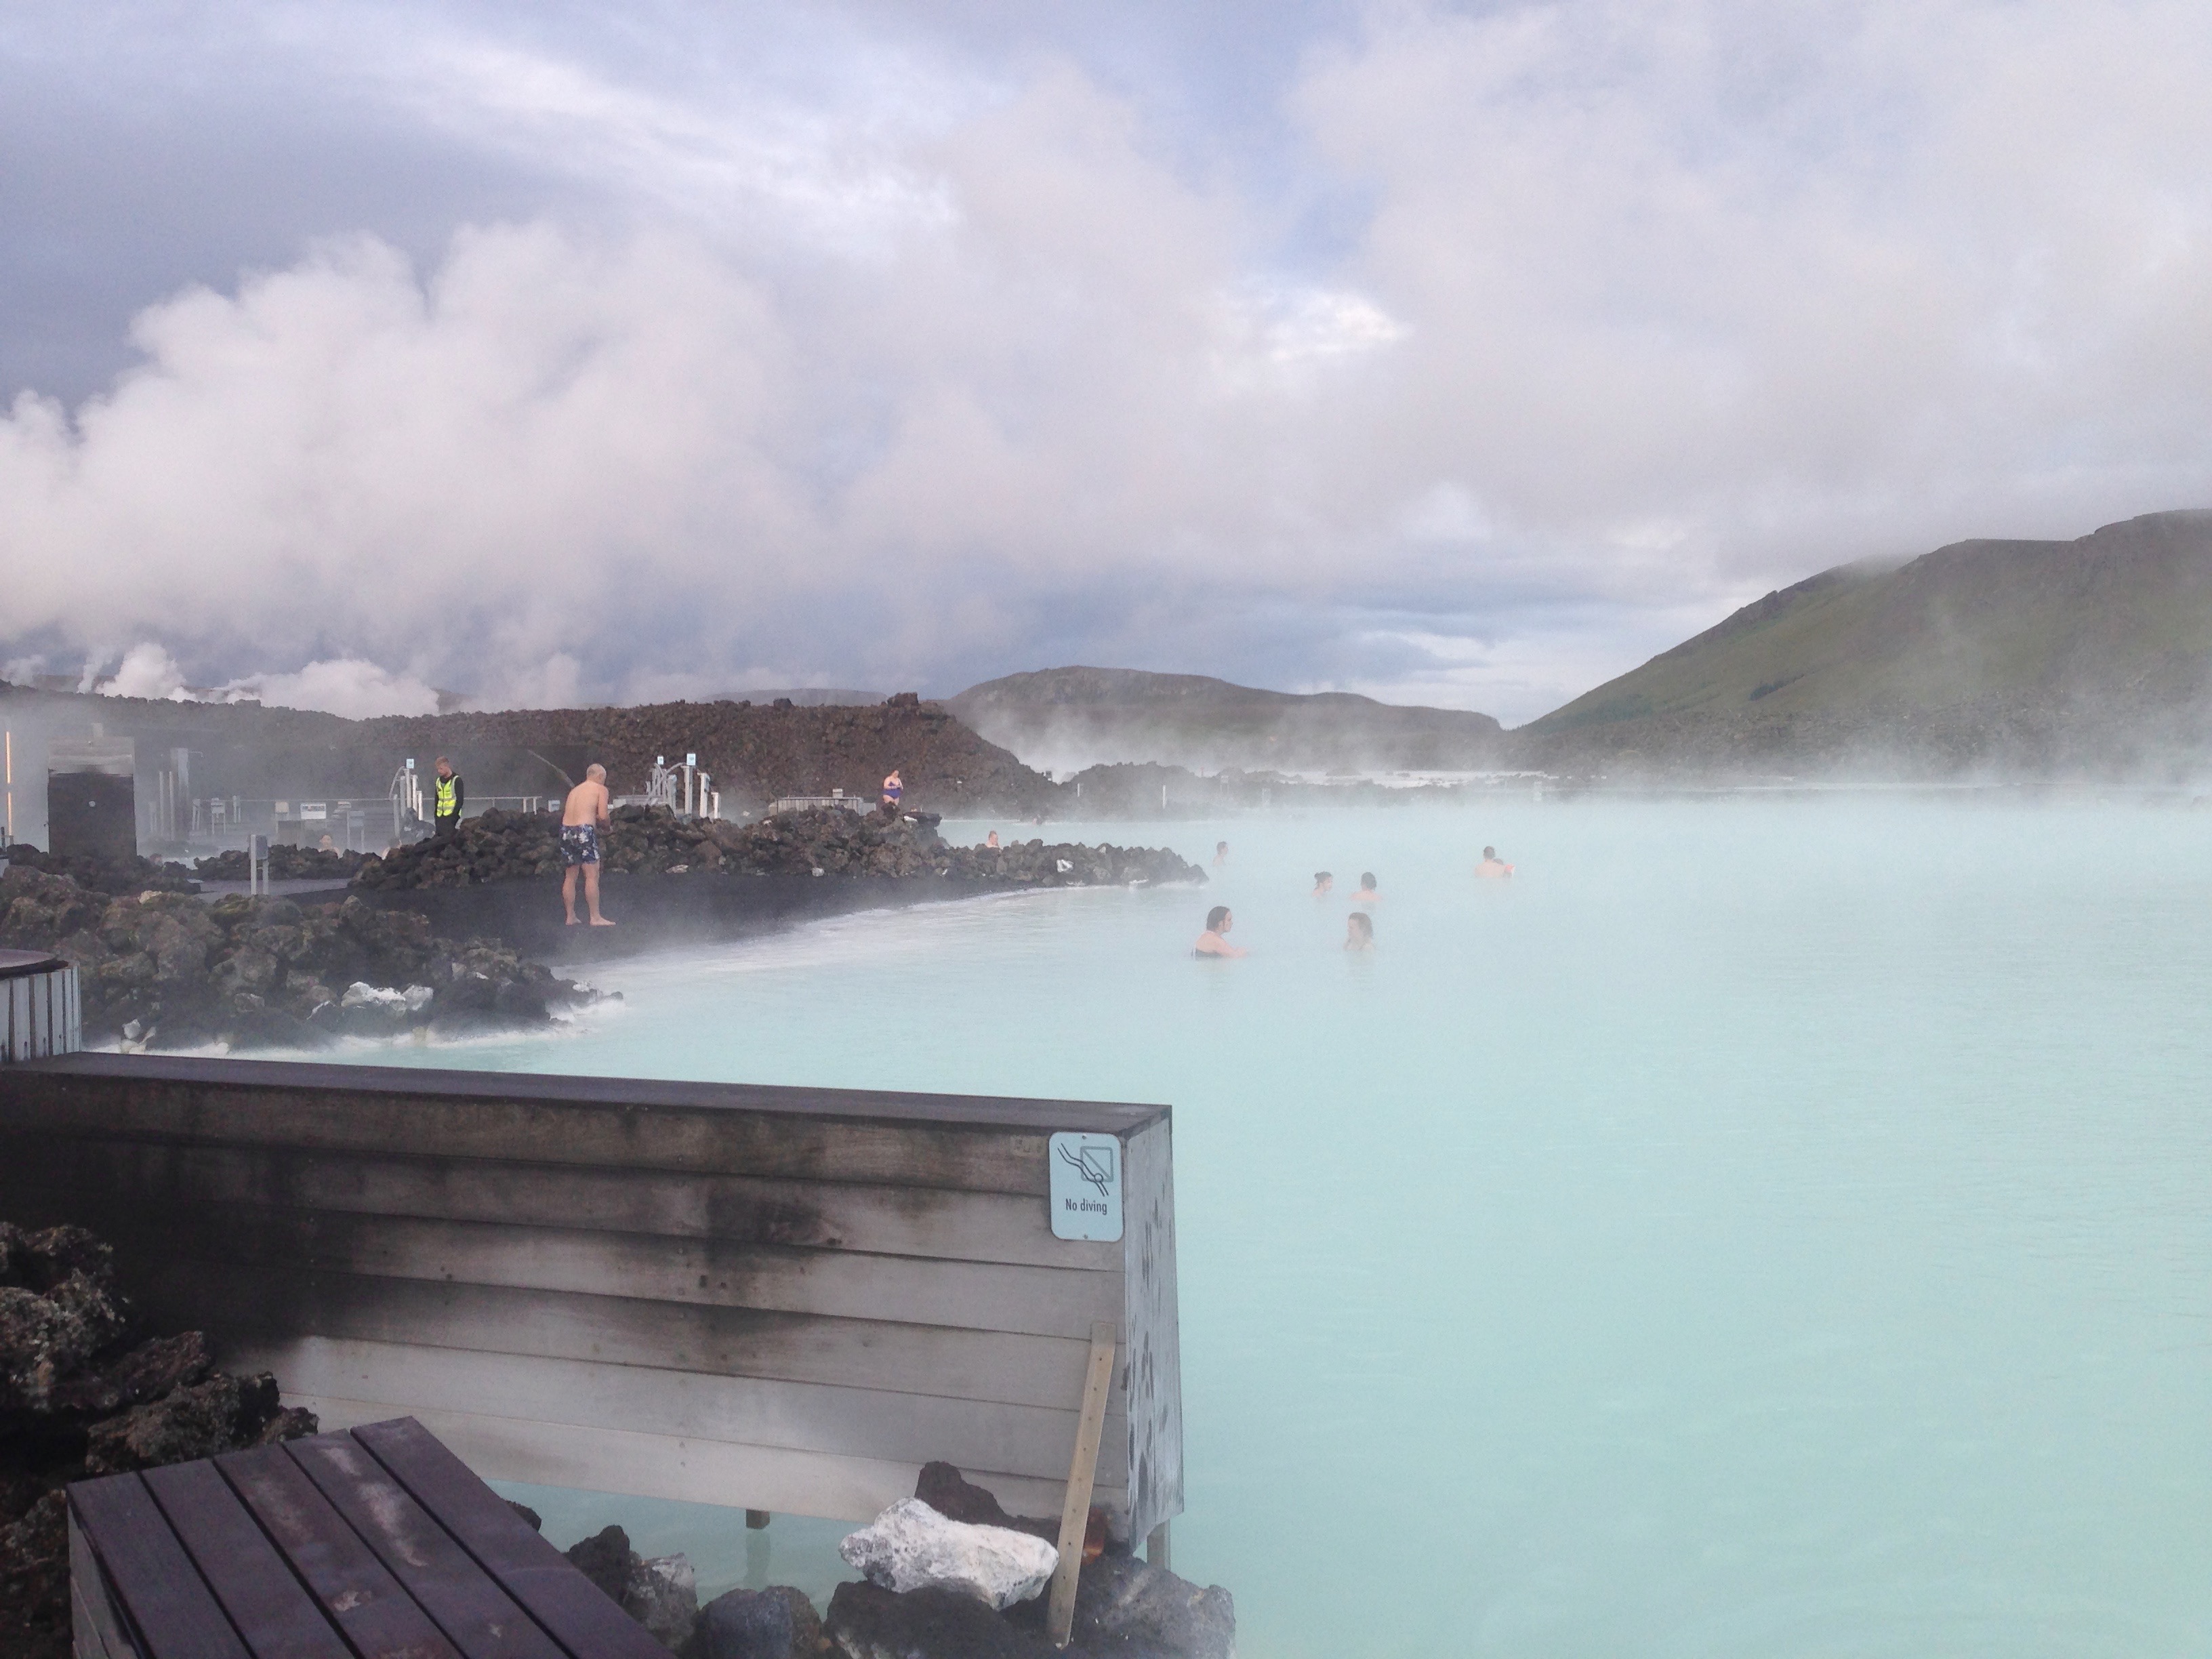
If your time is very limited the closest attraction to Keflavik airport is Blue Lagoon It is a little pricey, but is an amazing and unqiue experience.

Downtown Reykjavik

The next closest attraction is downtown Reykjavik main shopping area, Laugavegur street. It is about a 40 minute drive from the airport and has lots of shops and a few different attractions. I highly recommend a little bakery called Sandholt. The food was great and it ended up being our go to place for starting our day.

The other stop we made each day was for coffee, of course, and the best place we found was Reykjavik Roasters. The espresso was fantastic and their croissants were very tasty.

While wandering downtown you should walk out to the harbor and check out the modern looking Harpa Concert Hall

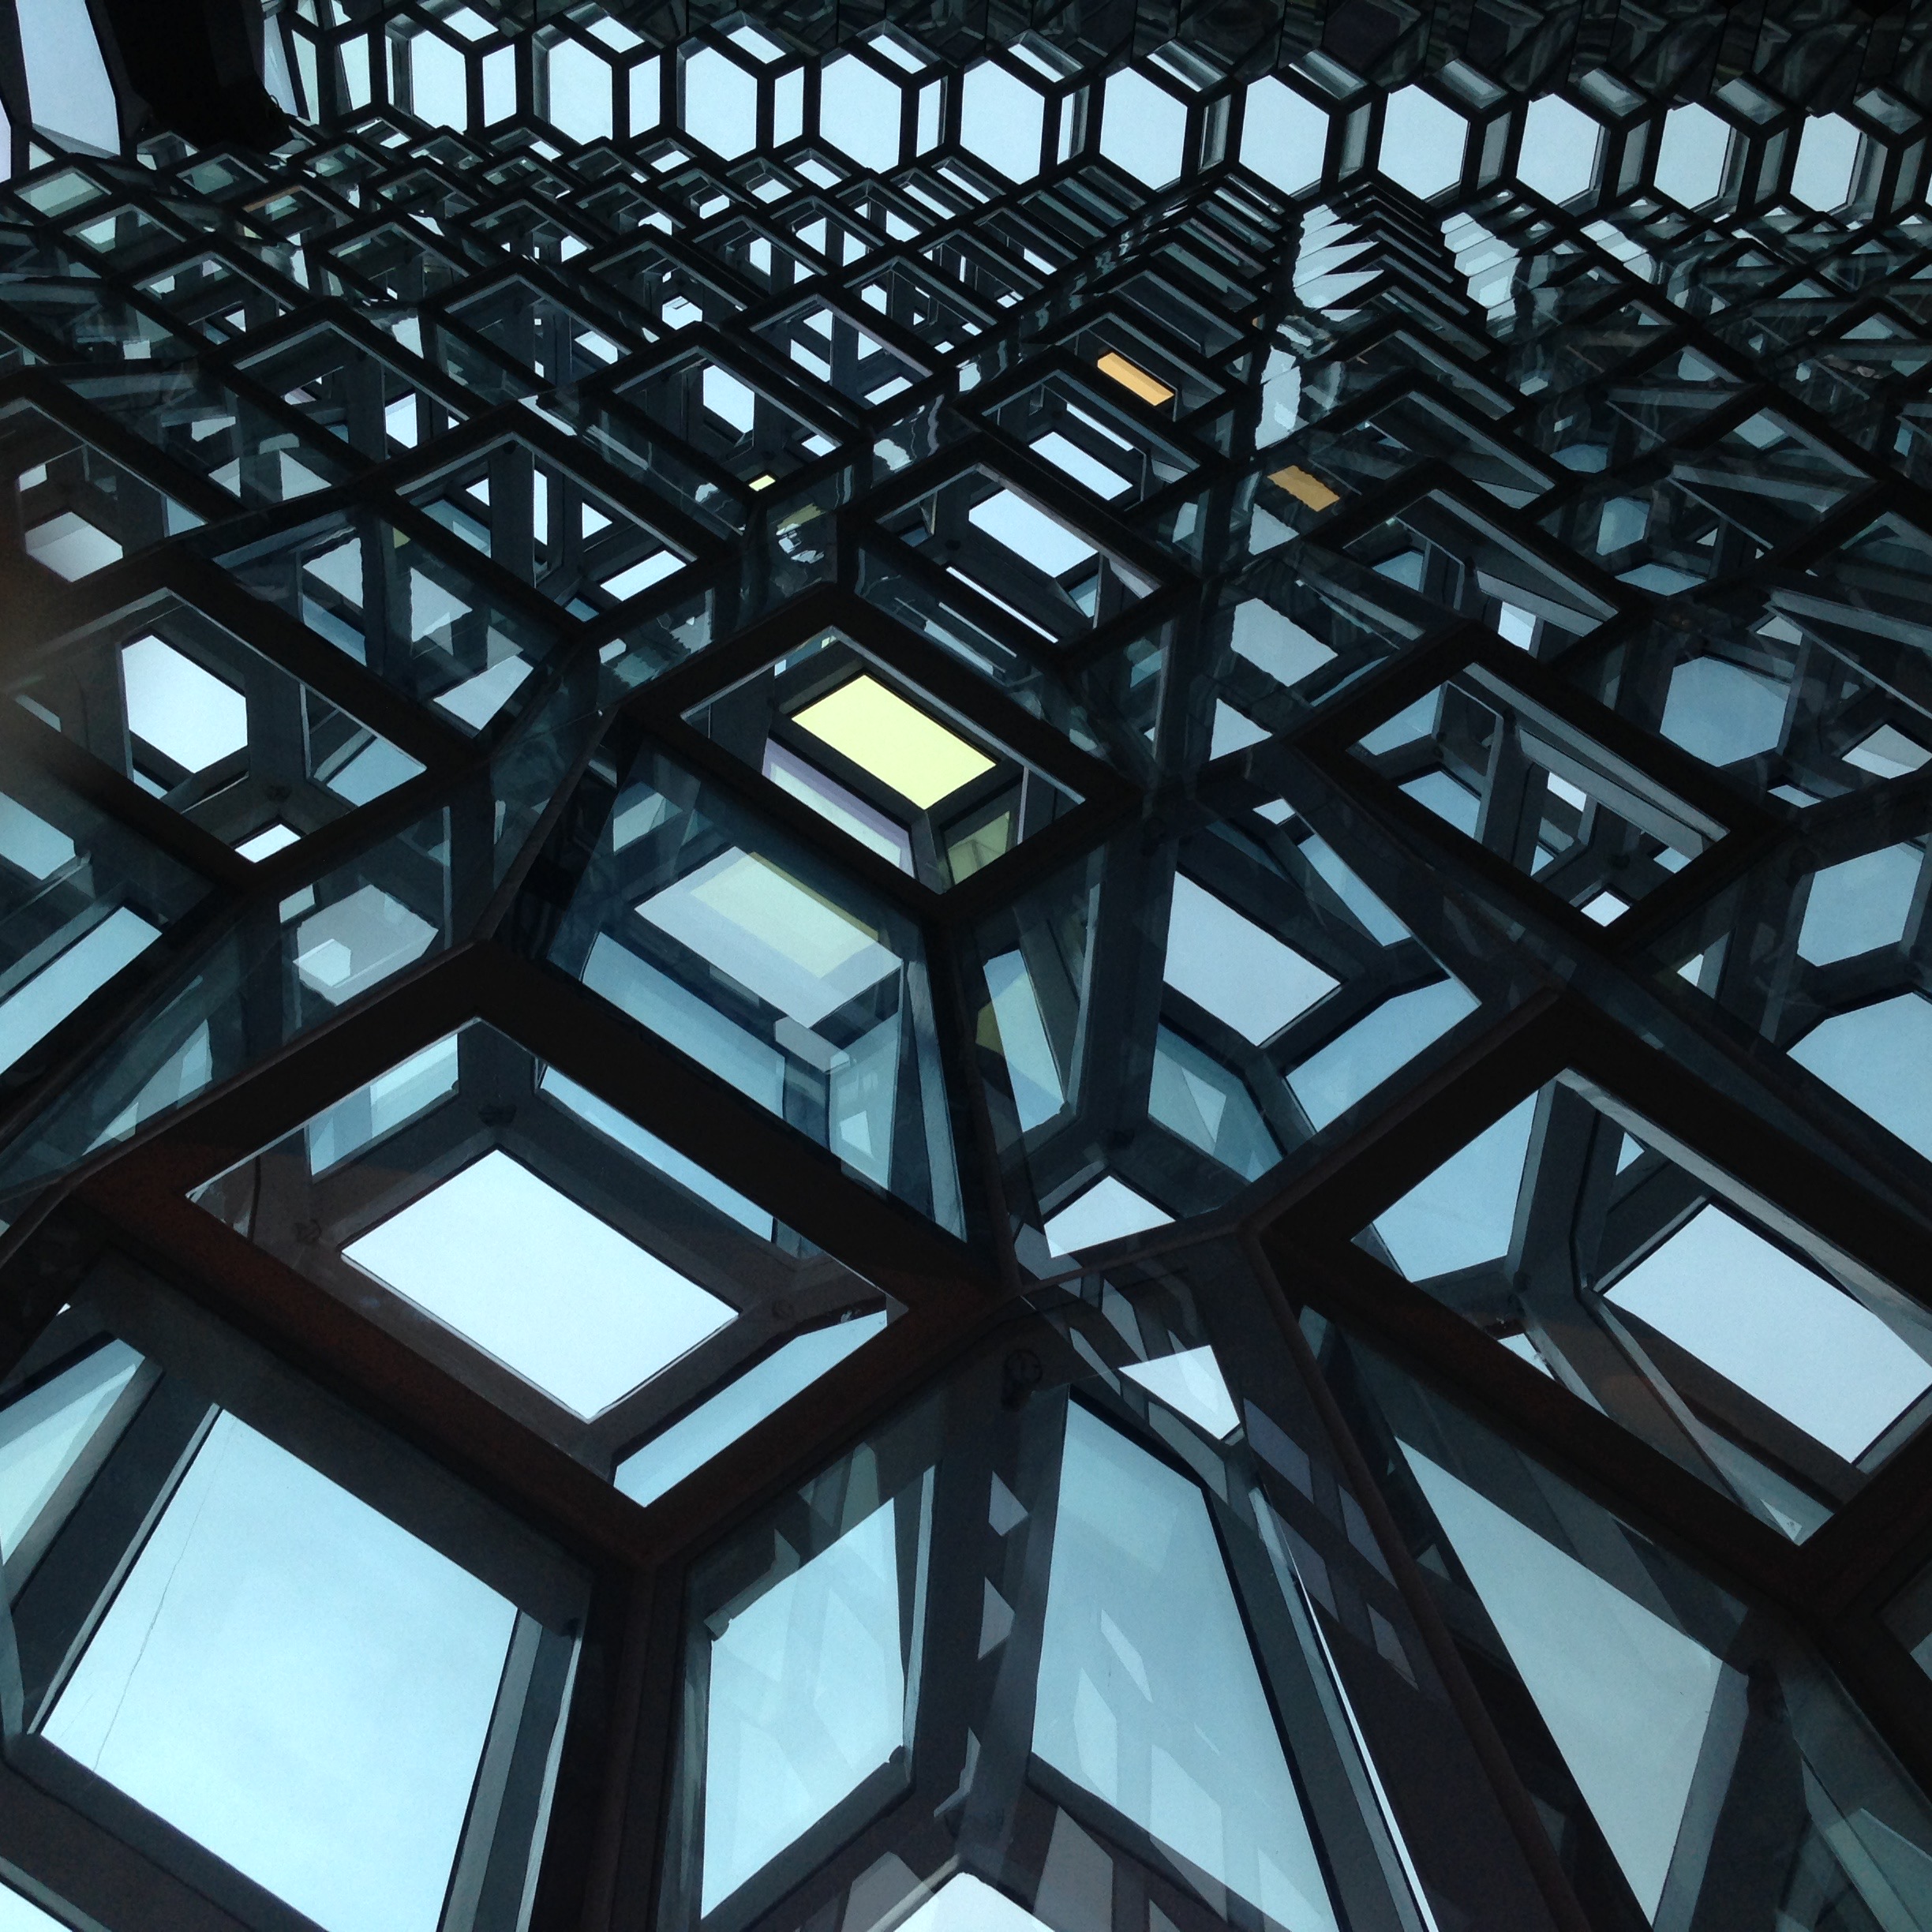
Up the hill from the harbor is a statue of Leif Eriksson next to the Church of HallgrĂ­mur

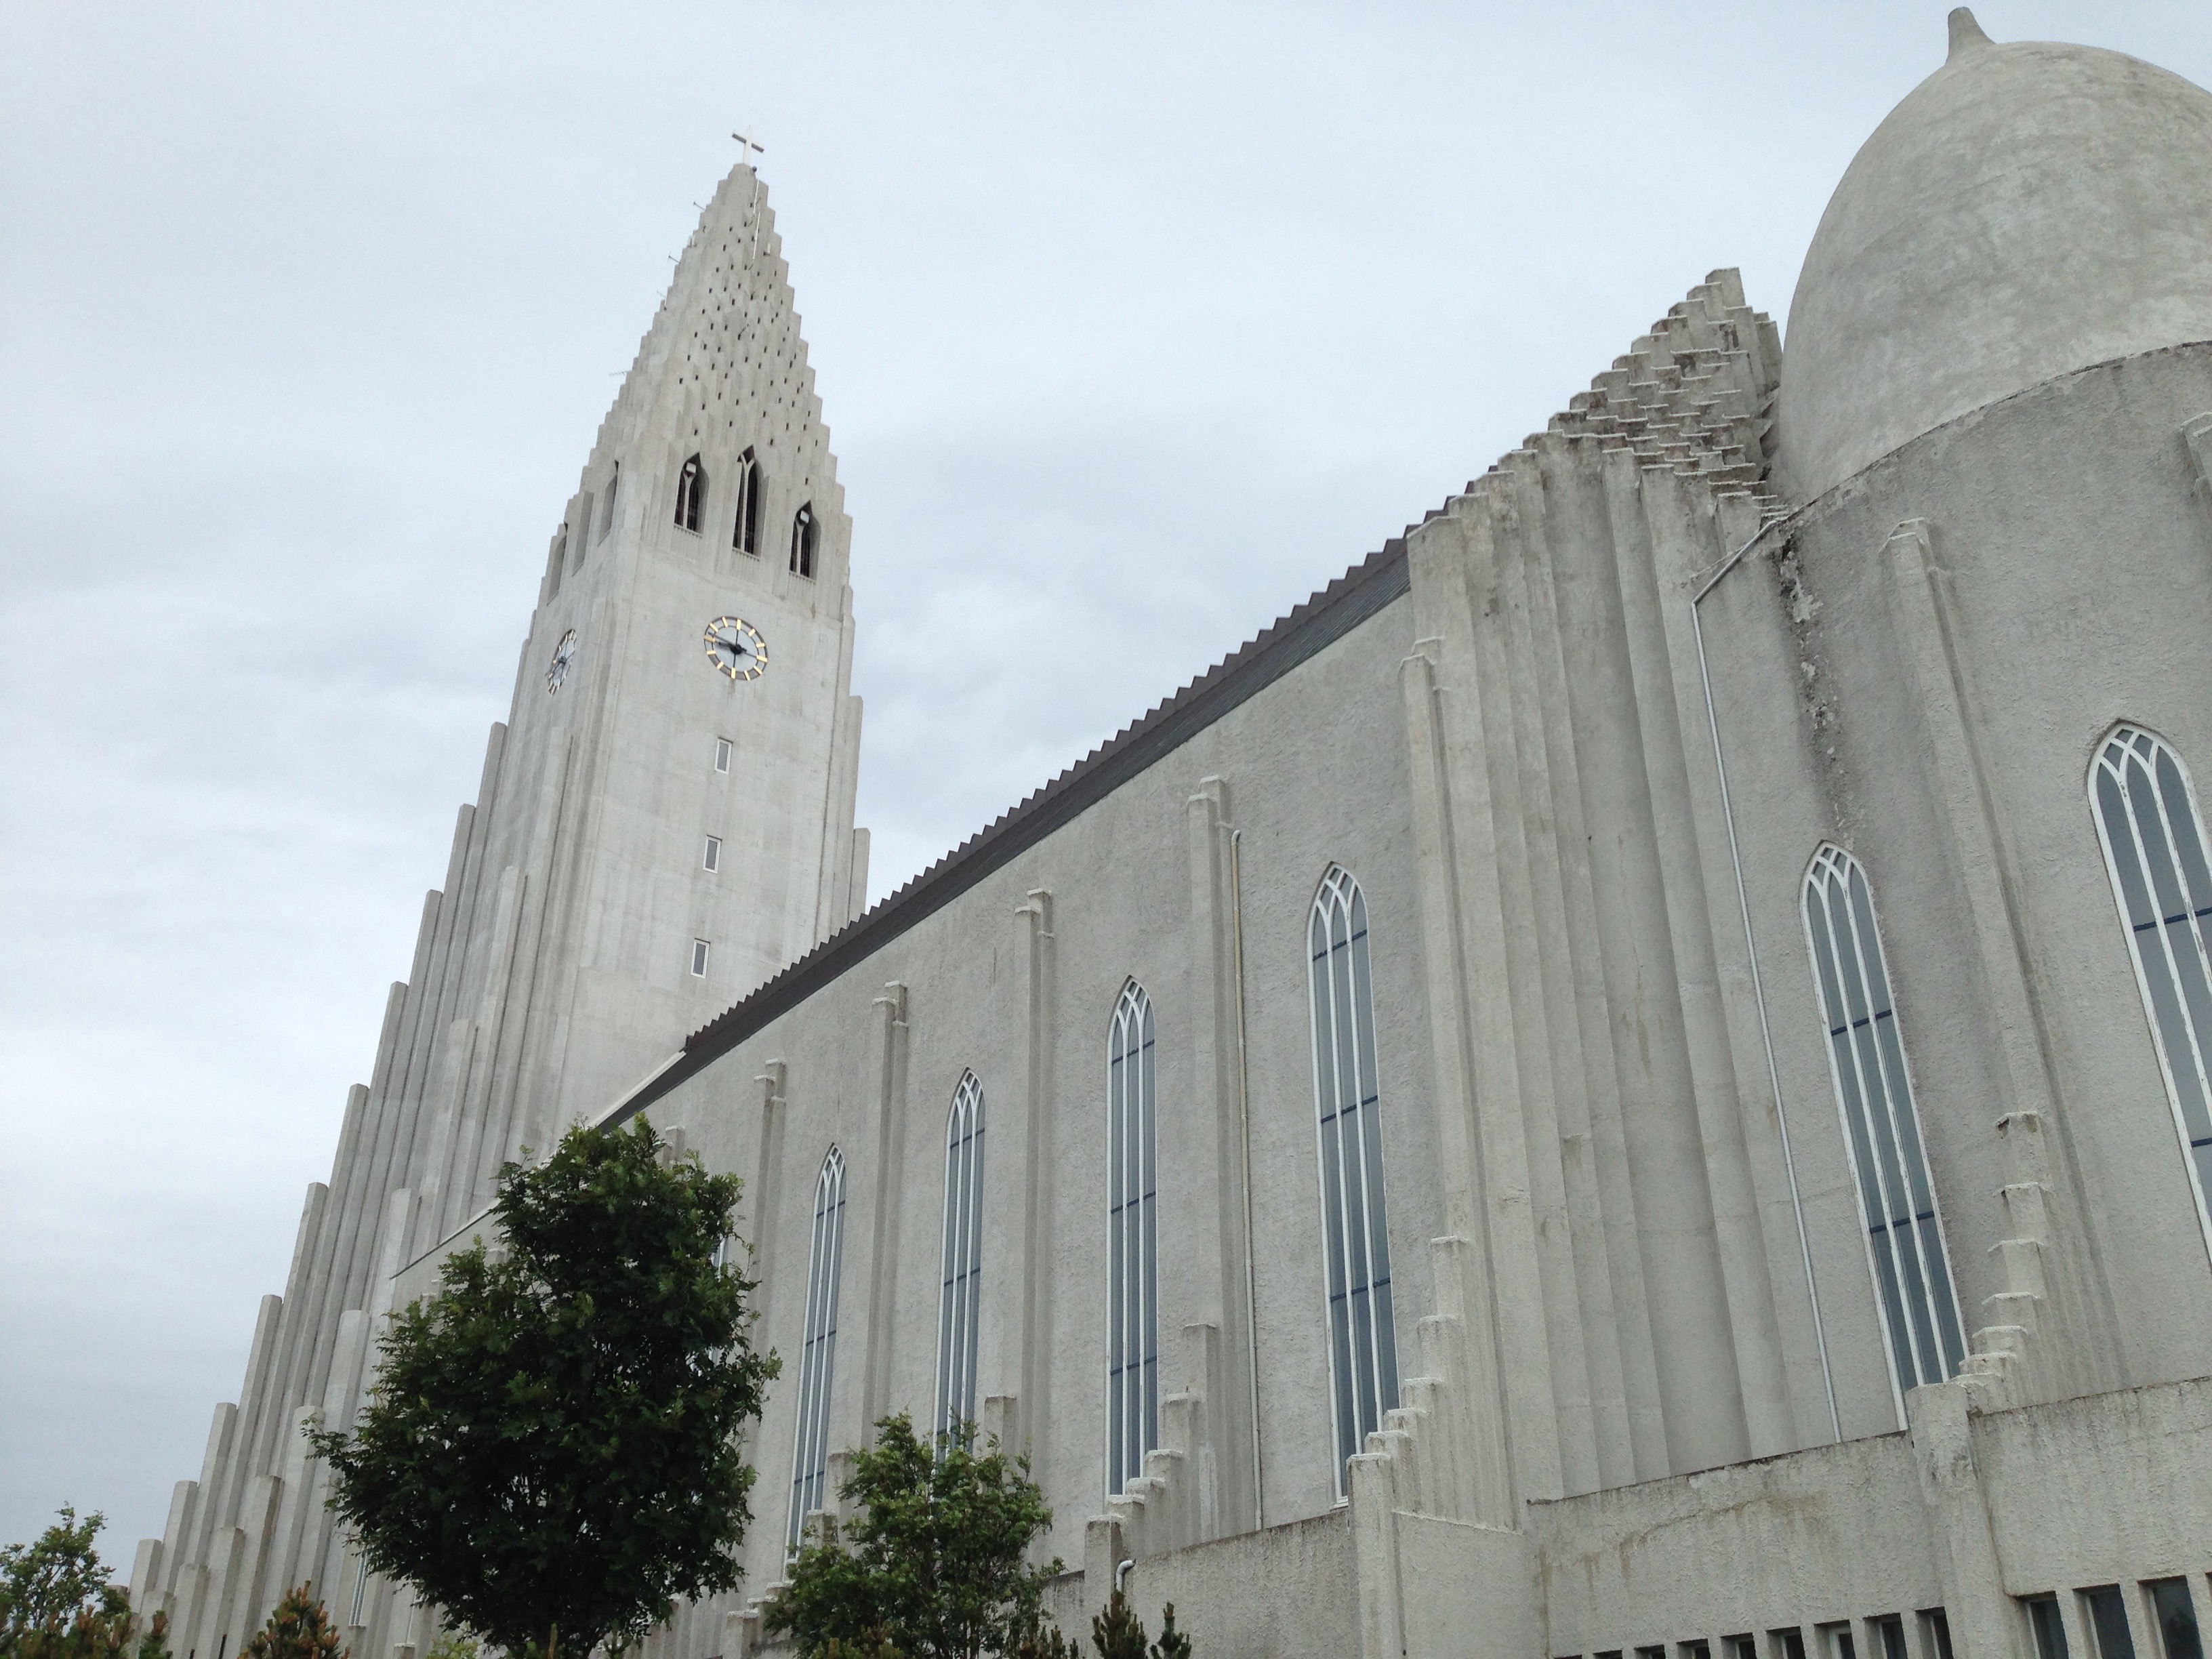
Finally, if you happen to be downtown in the evening or late night you should check out the amazing hot dogs at Bæjarins beztu pylsur.

Golden Circle

Besides the Blue Lagoon the second thing you are most likely to hear about Iceland is the Golden Circle. It is a tourist loop that starts near Reykjavik and takes people to several different geologically significant features.

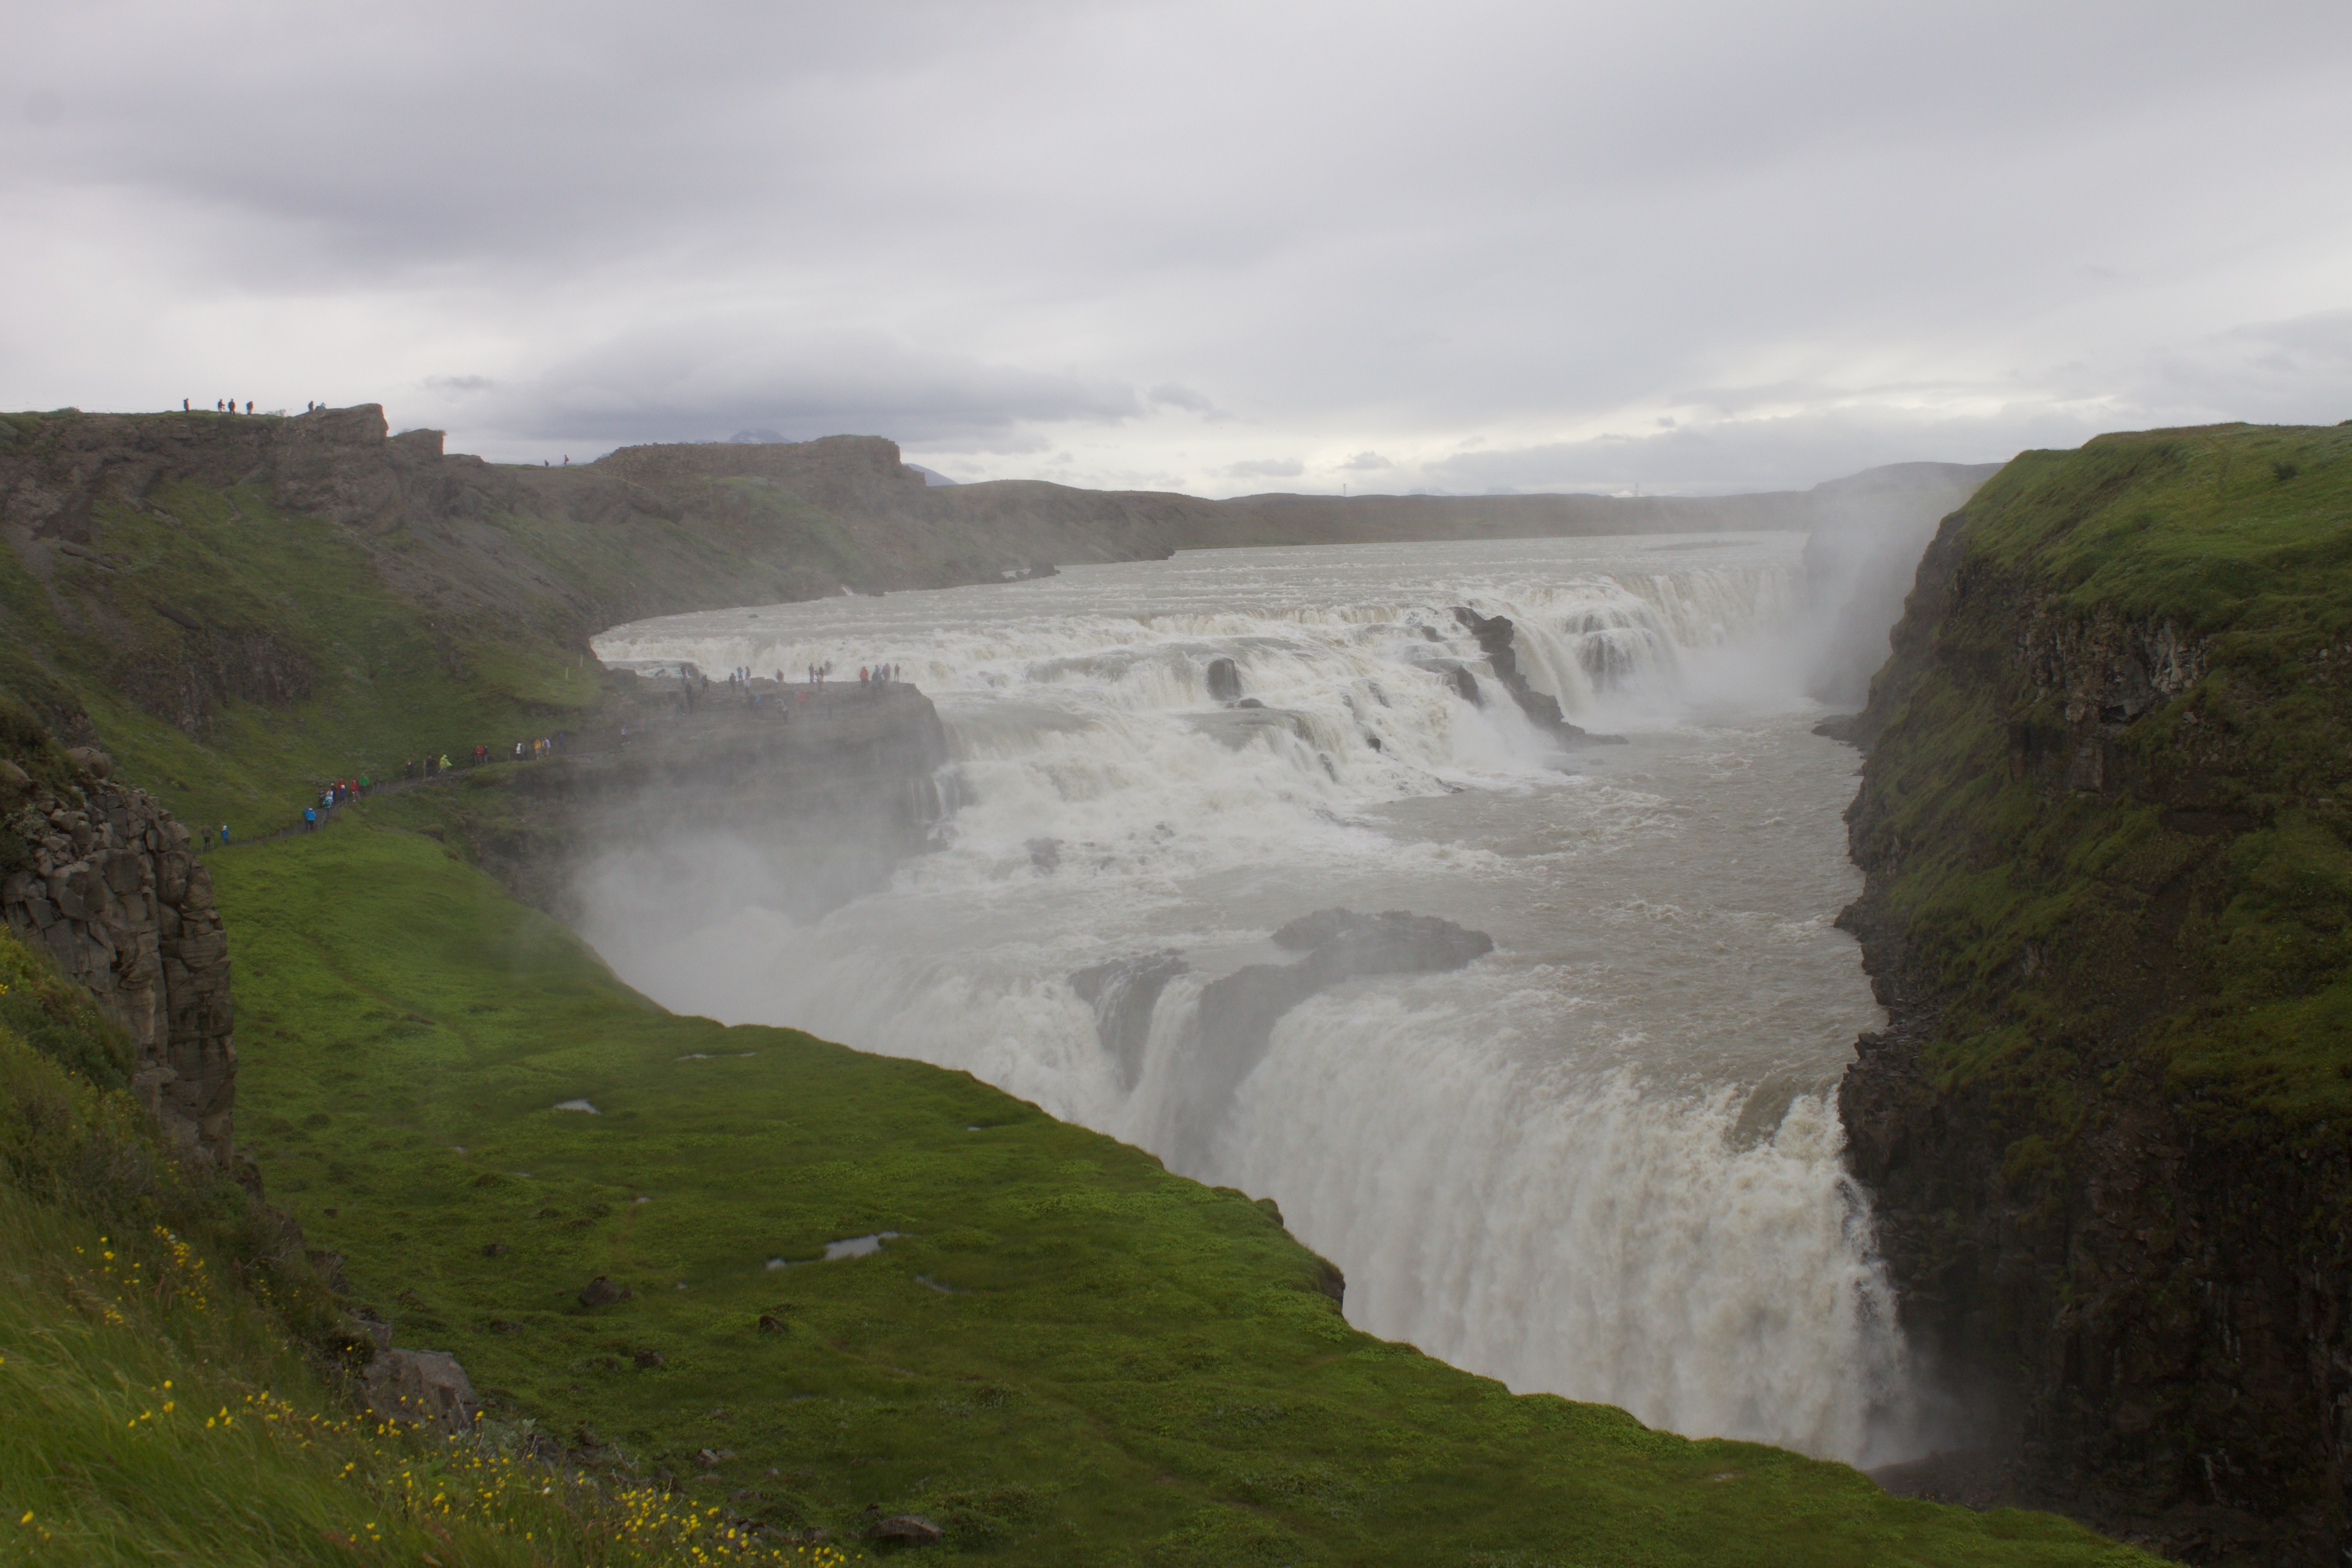
One of the attractions on the northern end of the loop is Gullfoss. It is a huge waterfall with a great visitor center and a nice lunch spot.

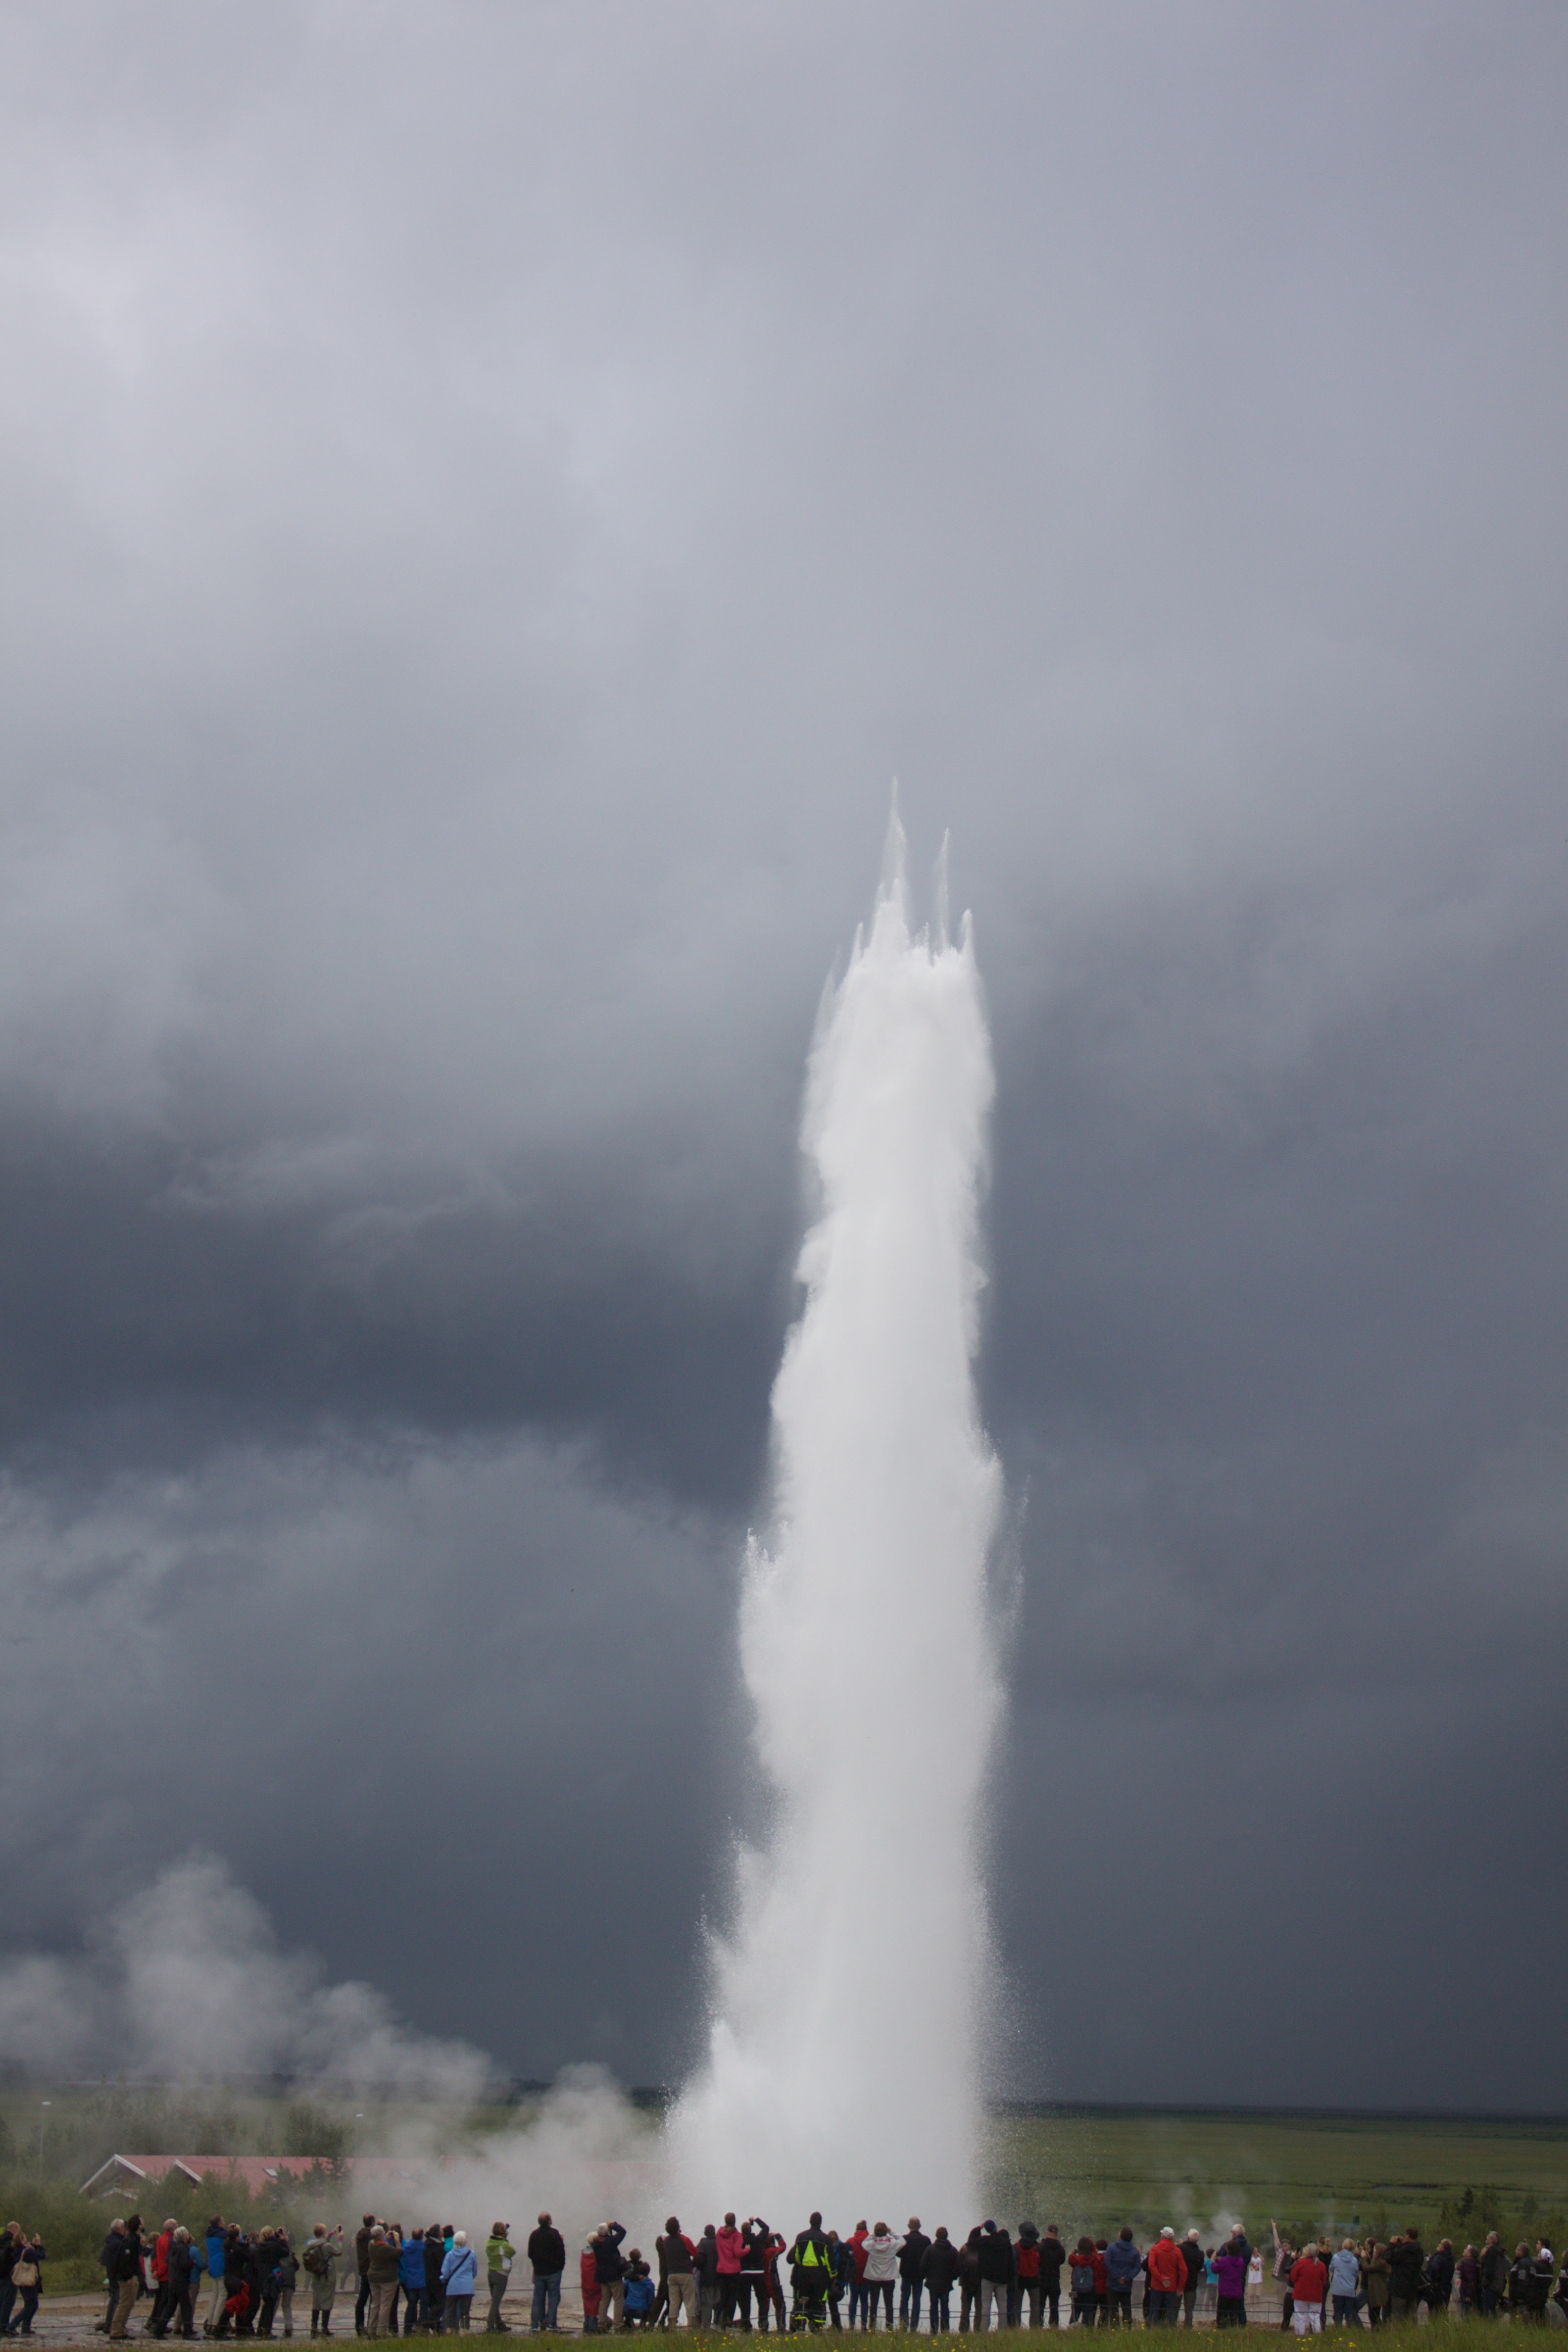
Heading back towards Reykjavik on the loop you will come to Geysir. It is a pretty small area with several different hot spring related features include a couple different geysers and multiple boiling mud pits. Here is an image of one of the larger geysers.

One of my favorite stops on the Golden Circle was Althing in Thingvellir National Park. It is the boundary of the North American and European tectonic plates and makes for some dramatic terrain.

Southern Iceland

If you choose to skip the Golden Circle, but want to check out something slightly less touristy head a couple hours east of Reykjavik towards Skogar. The road there will let you experience many different types of terrain you will find in Iceland. After driving across a long flat plain you will see your first big waterfall, Seljalandsfoss. It is a great place to stop and take some photos before continuing along the shore in front of one of the large glaciers on the island.

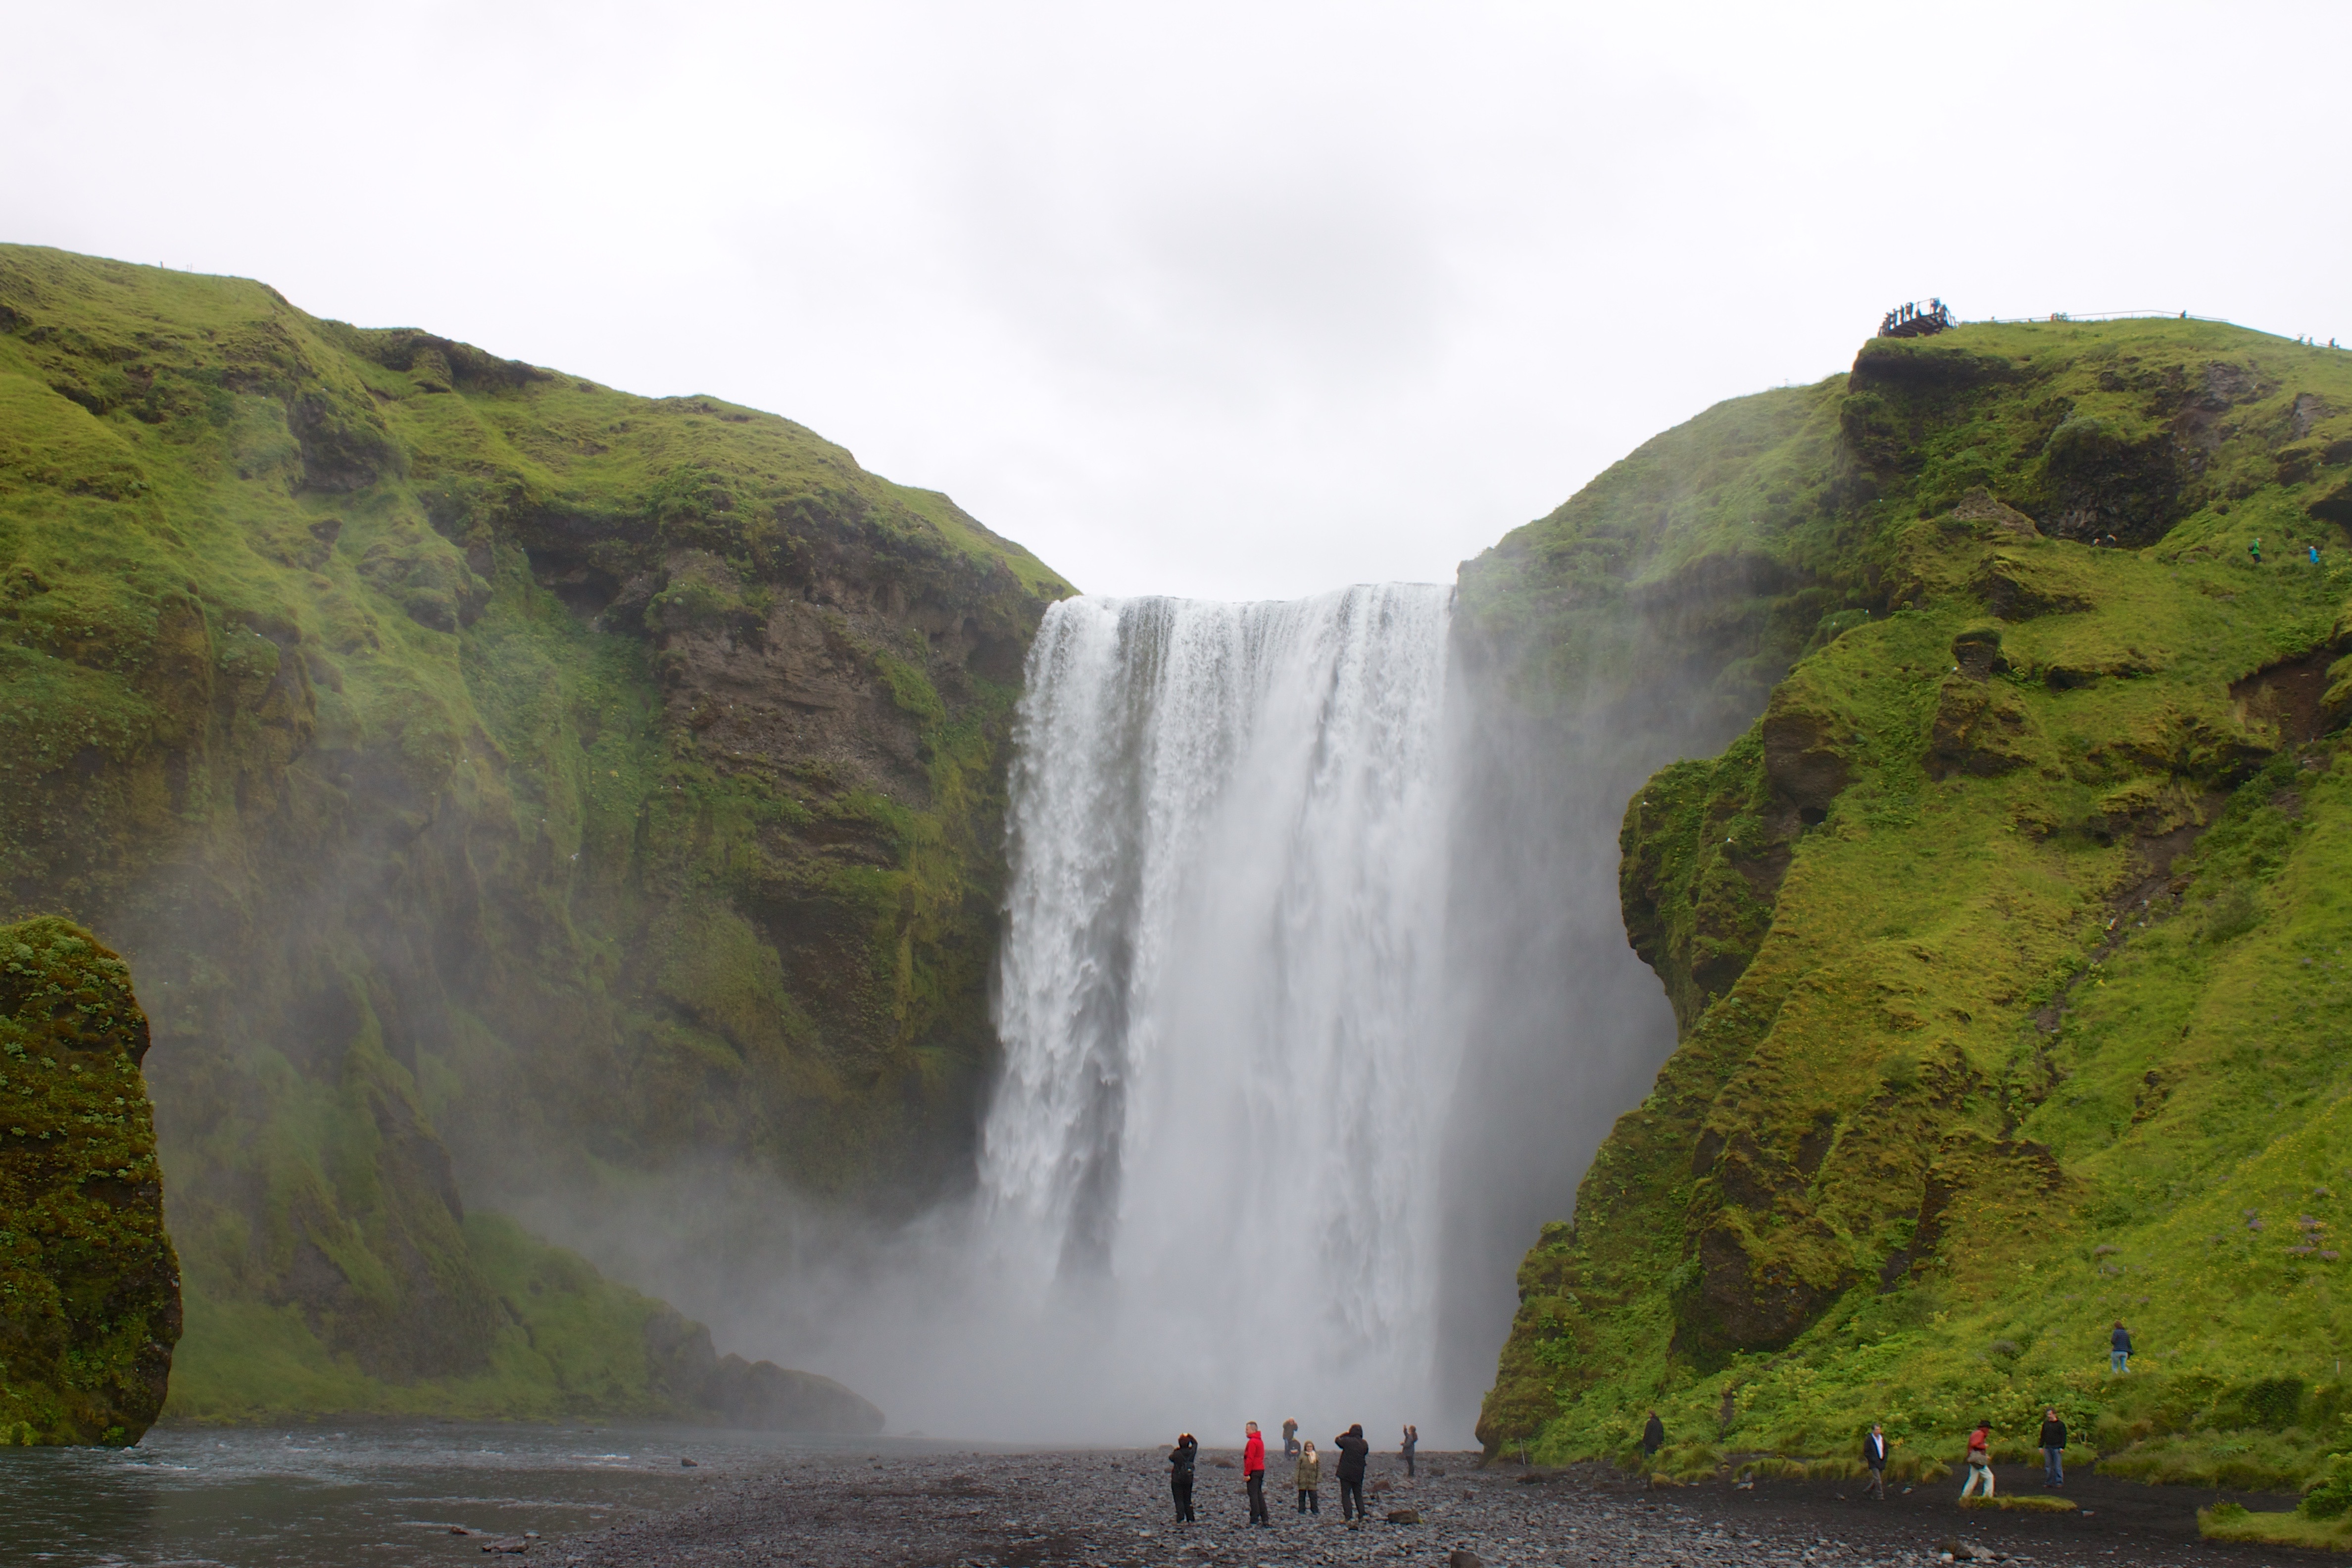
A little further east of there is the waterfall you have probably seen in every video about Iceland, Skogafoss It is huge and has a long staircase you can climb to get to the top of it. However, if you have some extra time once you are at the top of the big waterfall you can climb over a little barrier and follow a hiking trail that follows the river uphill with some amazing views of some smaller waterfalls.
Finally you will arrive at the Skogar Museum, where you can learn about Iceland and explore some classic Icelandic structures.

Assorted travel tips:
  • The exchange rate at the time of this post is about 108 Krona to 1 dollar, so just drop the last two numbers of the krona price to get a comparable dollar value. 500 krona pastry would be 5 dollars.
  • We rented a car so we could “choose our own adventure”, but there are many tour groups that can take you to all of the above attractions.
  • Most people speak English, but as always it helps to learn some words, Icelandic Phrasebook

Thursday, April 19, 2018

Creativity Drought

Over the last couple years I have spent a lot of spare time working on various creative projects including this blog, setting up and hosting my own website, drone videos, and the Kilobyte podcast. They each managed to challenge me in different ways, whether it was finding the right equipment for podcast recording, learning about setting up a Linux server, or understanding how to build and pilot a quadcopter. It was also difficult trying to find enough time in my schedule to work on each thing in a meaningful way. Somehow I managed to find the time and was quite happy with my first pass at all of it.

Going into this year I hoped to adopt a yearly theme as was discussed on Cortex #62: 2018 Yearly Themes. The basic idea is to find a theme for the year (or season) and use it as a guide for decisions throughout the year rather than setting a bunch of goals for the year you are likely to break. I spent several days thinking about the past year, what I had accomplished and the direction I wanted to head for the upcoming year. It was really important that I build on the previous year’s learning, but step it up in some way. Initially I was leaning towards creating content more consistently, but I think before that I need to make it easier for me to actually create and post the content.

I was getting close, but just as I started to narrow down on a theme something happened and I got distracted. It is hard to say for sure what happened, but my creative output went down to zero. Thankfully I have recognized it and have started down the road to correcting course. Here is my first step in creating more content again with hopefully more to come soon.

Thursday, April 12, 2018

MacOS, Maven and Tilde Folders

I recently set up a new MacBook Pro for development and installed some developer tools like Java and Maven.  After checking out my source code from Subversion and building it using Maven a folder with the name tilde (~) appeared in the same directory as my source code.  I deleted the folder and a little while later I noticed it was back.  After some digging around I found that setting the path of my local maven repository in my settings.xml file so it started with a ~ for my home directory was the problem.  Every time I ran a build it was trying to put a new local repository in a tilde directory of the working directory.  After updating the path to use /Users/{username} it stopped creating the tilde folder.

Monday, February 26, 2018

Angular CLI Upgrade 'Cannot find module' Error

Every couple months I try to upgrade to the latest version of the Angular CLI and every time I run into this error.

Cannot find module 'webpack/lib/dependencies/ContextElementDependency'
Error: Cannot find module 'webpack/lib/dependencies/ContextElementDependency'
    at Function.Module._resolveFilename (module.js:469:15)
    at Function.Module._load (module.js:417:25)
    at Module.require (module.js:497:17)
    at require (internal/module.js:20:19)
    at Object.<anonymous> (C:\Users\\node_modules\@ngtools\webpack\src\plugin.js:8:34)
    at Module._compile (module.js:570:32)
    at Object.Module._extensions..js (module.js:579:10)
    at Module.load (module.js:487:32)
    at tryModuleLoad (module.js:446:12)
    at Function.Module._load (module.js:438:3)

Every time I realize I miss a step so I want to document the steps I ended using so I don't have to search for the solution again.  All the steps below are recommended by the Angular CLI Upgrade page, except the highlighted step below that removes the package-lock.json file.

Global install upgrade
NPM will keep a globally installed version of the Angular CLI that will be used across the system. It is updated using these steps, which will uninstall the current version and then install the new version.

npm uninstall -g @angular/cli
npm cache verify
# if npm version is < 5 then use `npm cache clean`
npm install -g @angular/cli@latest

Local install upgrade
The Angular project itself will have its own version of the CLI installed in the node_modules folder of the project.  It is updated using these instructions, which will remove the node_modules directory, update the version of the dependency in package.json and then reinstalls all the dependencies.  

rm -rf node_modules dist 
rm package-lock.json # deletes the package.json lock file
npm install --save-dev @angular/cli@latest
npm install

Friday, February 2, 2018

Windows 10 Hyper-V and Samsung 960 SSD Issue

I was following these great instructions, How to Create a Linux VM Using Hyper-V and when I got to the part where you actually create a new VM the computer frozed and restarted.  I tried this a couple more times with the same result.  I did a quick Google search and found this, Microsoft Forum Discussion on Samsung NVME Driver Issue .

In summary there was an issue with the Samsung Storage Controller driver version 2.1 that was causing the OS to crash when creating a new VM using Hyper-V.  You can check your current driver version by
1. Go to Start
2. Search for Device Manager
3. Expand the Storage Controllers node in the Device Manager
4. Double click on Samsung NVMe Controller to launch the details
5. Go to the Driver page and look at the Driver version.

The good news is that Samsung has released a fix for the issue with version 2.2 which you can download directly from Samsung at http://www.samsung.com/semiconductor/minisite/ssd/download/tools.html (just go to the Driver section for the installer and instructions).

After running the installer and restarting my machine the Hyper-V Manager successfully created my new VM.

Tuesday, January 23, 2018

An iOS Laptop

The one device I would like Apple to release in 2018 is a laptop that runs iOS. I have been thinking about this a lot since reading Jason Snell’s piece at MacWorld, Why Apples Next Laptop Should Run iOS and the related discussion on Upgrade #168: Hail Hydrant. The addition of the Files app and better multi tasking in iOS 11 has made the iPad an even better alternative for those looking to get rid of their Windows or Mac laptop. However, I haven’t seen a lot of people switching out there laptops for an iPad, but instead moving towards Windows or Chrome OS convertible devices. I think the tablet form factor of the iPad combined with some out of date understanding of the capabilities of iOS coupled with the adoption of Chromebooks in schools is keeping people from making the switch.

It seems strange, but I think one of the big things keeping the iPad out of the conversation is the tablet form factor. If a person is looking to replace their old laptop or desktop they look at the iPad and it just does not seem like a replacement because it is perceived as just a tablet. They may see the Smart Keyboard attached to it in the store, but that is just an accessory for a tablet. People seem to have an association with the first class keyboard and a “main” computing device. The laptop form factor provides an extra level of comfort and consistency users may not feel with a tablet. The Smart Keyboard is also limited to being used on hard surfaces, which might also turn some people off.

The next thing holding back the iPad as a person’s main computer is the misconception that you can’t do a lot of “computer” things on them. It is probably just a hold over from the early days of the iPad when it was the next big thing and not only was the operating system pretty limited, but the quality of apps in the app store was also very low. Most people held on to their iPad 1 or iPad 2 for several years and never got to experience the more powerful iPads of the last few years or the new crop of apps that pushed the limits of tablet computing. If it was not for the last two years of daily iPad use and hours of podcasts helping me retrain my brain to work with a different style OS, I might also disregard the iPad Pro too.

Chromebook adoption in school’s could also be a factor as children start to get their own devices at home. My son has been using Chromebooks in school for a couple years now and has become very proficient navigating Chrome OS. Last fall, his homework required a device at home and he asked for a Chromebook. After a little research I found that while the low end Chromebooks are cheap; in order to get something with a little more longevity and higher quality you have to spend quite a bit of money. I briefly considered getting a MacBook for him, but then realized if anybody could make an iPad work for his tasks it was my son. I explained to him how his iPad Air could do all of the things the Chromebook could do and more. Of course the lack of a keyboard was an issue so I bought the Element Digital bluetooth keyboard case and despite the smaller keys he is quite happy with his setup. Unfortunately I think we are the exceptional case and most parents would purchase a $200 Chromebook and call it a day instead of spending twice as much for an iPad and a keyboard.

The combination of iOS and the iPad is now mature enough to be used by most people as their non-smartphone device. The first step Apple should take is to create an iOS device with a more familiar laptop form factor for iOS. The device would still support touch for some activities, but the keyboard would be the main input device. It would require a little more polish to keyboard shortcut on iOS, but for the most part it should be compatible out of the box. The next part is a bit trickier and involves Apple getting the word out that iOS on iPad can now do much more than it could back in the iOS 5 days when they owned their first iPad. Finally the new lower price point for the regular iPad should help make the iOS on iPad experience much more affordable when compared to other devices and the iPad Pro. I am convinced that iOS is the future of Apple devices and now is the time to start to expand beyond the old tablet form factor and into more interesting form factors like a 13” laptop or maybe even something as boundary pushing as a 21” desktop machine.

Friday, January 5, 2018

Work From Home Difficulties

Yesterday we received over a foot of snow, so unlike previous years I decided to work from home.  It is nice that I have a space upstairs that is somewhat separated from my families, although it isn't in a room where I can close the door and I can hear all the goings on elsewhere in the house.  Thankfully I can play music while I work and this blocks out that noise.  The harder thing is trying to work on the 22" inch monitor at home, because it has about a quarter of the pixels of my 28" 4K monitor at work.  I immediately feel so claustrophobic and struggle to get used to the space.  The only other difficulty is that I only have Apple keyboards at home so my brain has to remap some of the key combinations. 

Thankfully we only get a few storms like this a year and for the most part I stick to working in the office.  I'm not sure if maybe I should practice more, by spending a day at home every other week.